Showing posts with label recipes. Show all posts
Showing posts with label recipes. Show all posts
Sunday, July 14, 2013
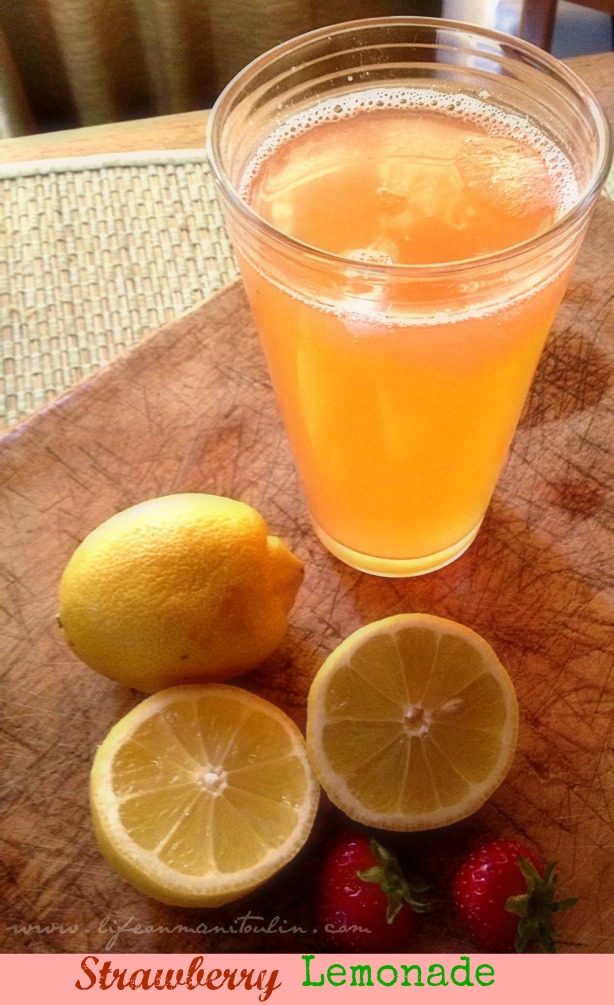
Fizzy Strawberry Lemonade
She slumped back into her armchair, face glistening from the heat. Another hot, humid Summer day. There was no reprieve from the heat. With no comfort of the air-conditioning she had in her city life, she had to remind herself that A) this was the "frugal farmer" thing to do and B) no A/C was far better for the environment. Yes, it was her duty as a citizen of the Earth to not use A/C and to find other ways to keep cool in the sweltering heat.
A dip in the lake? No. Her back took a beating from the strong rays of the sun at the beach the day before.
A run through the sprinkler? To be honest, the heat was too intense. Plus, sprinklers and hoses only invited a certain four year old girl to soak her Mama and the dog.
What could possibly offer some refreshment and momentary comfort in this heat?
 That was the solution! With a bumper crop of strawberries, making a cool, refreshing pitcher of strawberry lemonade would quench her family's thirst and keep them cool and refreshed. With the "special" fizzy water that everyone in the family loved so much, this was absolutely perfect.
Even the four year old was a huge fan of S. Pellegrino Sparkling Natural Mineral Water. This is not a sponsored post, by the way! We actually really love S. Pellegrino and have a few bottles on hand at all times!
 Ingredients:
2 cups strawberries, washed and tops removed
1 cup lemon juice (you can use Real Lemon, but I prefer freshly squeezed lemon juice - for the lemons I get at our grocery store, 1 cup is equaled to 8-10 lemons)
1 (750 mL) bottle of San Pellegrino Sparkling Natural Mineral Water, chilled
Simple Syrup (1 cup sugar, 1 cup water)
Ice
Instructions:
Prepare syrup by boiling sugar and water in a pot. Once sugar is completely dissolved, remove from heat and let cool completely.
Puree the strawberries by adding strawberries and simple syrup into blender and "puree". I like a smooth drink, so I press strawberry puree through a strainer to remove the seeds and solids. Only let the strawberry juice through. You can put the strawberry pureed "pulp" into ice cube trays to use for other recipes later on.
In a pitcher, add lemon juice, strawberry juice (made from your strawberries and simple syrup), and 1 (750 mL) bottle of San Pellegrino.
 Serve in a tall glass with ice. Garnish if you wish, but you're probably just going to want to drink it and forgo the garnishes because it's so tasty!

Enjoy!
A dip in the lake? No. Her back took a beating from the strong rays of the sun at the beach the day before.
A run through the sprinkler? To be honest, the heat was too intense. Plus, sprinklers and hoses only invited a certain four year old girl to soak her Mama and the dog.
What could possibly offer some refreshment and momentary comfort in this heat?
Fizzy Strawberry Lemonade!
Even the four year old was a huge fan of S. Pellegrino Sparkling Natural Mineral Water. This is not a sponsored post, by the way! We actually really love S. Pellegrino and have a few bottles on hand at all times!

2 cups strawberries, washed and tops removed
1 cup lemon juice (you can use Real Lemon, but I prefer freshly squeezed lemon juice - for the lemons I get at our grocery store, 1 cup is equaled to 8-10 lemons)
1 (750 mL) bottle of San Pellegrino Sparkling Natural Mineral Water, chilled
Simple Syrup (1 cup sugar, 1 cup water)
Ice
Instructions:
Prepare syrup by boiling sugar and water in a pot. Once sugar is completely dissolved, remove from heat and let cool completely.
Puree the strawberries by adding strawberries and simple syrup into blender and "puree". I like a smooth drink, so I press strawberry puree through a strainer to remove the seeds and solids. Only let the strawberry juice through. You can put the strawberry pureed "pulp" into ice cube trays to use for other recipes later on.
In a pitcher, add lemon juice, strawberry juice (made from your strawberries and simple syrup), and 1 (750 mL) bottle of San Pellegrino.


Enjoy!
Thursday, July 11, 2013
Sizzlin' Summer Recipes with @CrosbysMolasses!
Summertime is BBQ season, kick back on the patio with a cold beverage season, and I-really-don't-want-to-turn-on-the-oven-let's-have-watermelon-or-salad-for-supper-instead season!

In my quest to try new-to-me recipes, I wanted to incorporate molasses into some of my dishes. Why? Well, being Asian, I didn't exactly grow up using molasses in my food as a kid, and I am now married to a farmer whose mom uses molasses in her dishes. There's a certain level of curiosity and also the want for a challenge, and that exciting challenge is cooking with molasses!
Sure, I can make a great gingersnap cookie with molasses, but I want to use it in BBQ recipes and things one wouldn't think to use molasses in!


In my quest to try new-to-me recipes, I wanted to incorporate molasses into some of my dishes. Why? Well, being Asian, I didn't exactly grow up using molasses in my food as a kid, and I am now married to a farmer whose mom uses molasses in her dishes. There's a certain level of curiosity and also the want for a challenge, and that exciting challenge is cooking with molasses!
Sure, I can make a great gingersnap cookie with molasses, but I want to use it in BBQ recipes and things one wouldn't think to use molasses in!

I came across some Sizzlin' Summer Recipes with Crosby's Molasses!
First up - Iced Chai! I'm a sucker for chai and lovely cool beverages on a hot Summer day! I was perusing Crosby's Molasses' blog, Molasses and More and found out that they have some FREE e-books with tons of molasses recipes!
This recipe in Crosby's Molasses Iced Chai recipe is divine!

1 cup milk (can substitute nut or soy milk)
1 tea bag chai tea
2 tsp Crosby's Fancy Molasses
1 tsp cinnamon
6-8 ice cubes
(makes generous serving)
Place milk and tea bag in a small pot and bring to a simmer. Remove from heat and let steep for 5 minutes, pressing down on tea bag with a spoon a few times.
Remove tea bag from milk, transfer to a blender, add cinnamon. molasses, and ice cubes. Whirr until it's slushy and a little foamy. Transfer to a glass and garnish with a sprinkling of cinnamon.
Both my husband and our 4 year old daughter love ribs! When I saw this recipe for Finger-Licking Oven Ribs in Crosby's The BBQ Book, I just had to make it!
The verdict? See for yourself?

No dinner would be complete without a tasty side dish! My family loves a good cabbage salad or coleslaw. The Carrot and Cabbage Slaw with Orange and Molasses Dressing looked interesting! I had to try it out!

Next week, I'm making the Molasses Glazed Grilled Shrimp and a salad with Molasses Herb Vinaigrette!
I'm really excited to have discovered the Molasses and More blog and Crosby's FREE e-books!
All of the recipes I featured on this blog can be found in Crosby's The BBQ Book.

Tuesday, July 09, 2013
Strawberry-licious! #WordlessWednesday w/ Linky

This Summer, our strawberries have been growing like crazy!

It's Summertime! These beauties are Strawberry-licious!
This said, I've exhausted all my recipes that call for strawberries. Strawberry jams, pies, cakes, smoothies, ice cream...all done over and over. Have you got any interesting and unique recipes that call for strawberries?
Link up your Wordless Wednesday posts here! We'd love to check them out!
Thursday, June 27, 2013
Oh, Canada! Recipes To Make Your Canada Day Weekend A Fabulous One! #LMDConnector
School is officially out for Summer! Little One just completed her first year of school! Forgive me if I get a little bit weepy! I cannot believe our little preemie is now a Junior Kindergarten graduate!
With the end of the school year and the beginning of Summer, what better way to celebrate than kicking the Canada Day long weekend off a little early?

 Check out my Maple BBQ Ribs recipe. Gotta love adding a little bit of Canadiana with some maple syrup made on our farm!

For outdoor entertaining, I've also got my Filipino BBQ recipe (which was featured in Eat In Eat Out Magazine!) and my Manitoulin Shawarma recipe (which recently made the Eat In Eat Out Blogger Spotlight).
I have a bunch of favourites my family and friends request that I make, but I'm always on the look out for new recipes to try. When I'm stumped, I frequent the Life Made Delicious website for recipe ideas. The recipes are quick, easy, and made with busy parents in mind, I'm sure! The neat thing is that for most of the recipes, Little One gets to help me from prep, cook, to assembly and plating!
Of course, nothing is sweeter than enjoying quality time with loved ones and a light, refreshing beverage and a scrumptious dessert together! Outdoor dining and spending time on the patio is what we look forward to in the Summer!
Some great ones to try are:
I've found these and countless other recipes on lifemadedelicious.ca. They've quickly become family favourites.
Check out the lifemadedelicious.ca website and let me know which recipes you'll be serving up this Summer!
Disclosure: I am part of the Life Made Delicious. Blogger program and I receive special perks as part of my affiliation with this group. The opinions on this blog are my own.
With the end of the school year and the beginning of Summer, what better way to celebrate than kicking the Canada Day long weekend off a little early?

Oh, Canada! How we love thee!
We also love BBQ season...especially with a Canadian favourite ingredient --maple syrup!

For outdoor entertaining, I've also got my Filipino BBQ recipe (which was featured in Eat In Eat Out Magazine!) and my Manitoulin Shawarma recipe (which recently made the Eat In Eat Out Blogger Spotlight).
I have a bunch of favourites my family and friends request that I make, but I'm always on the look out for new recipes to try. When I'm stumped, I frequent the Life Made Delicious website for recipe ideas. The recipes are quick, easy, and made with busy parents in mind, I'm sure! The neat thing is that for most of the recipes, Little One gets to help me from prep, cook, to assembly and plating!
Of course, nothing is sweeter than enjoying quality time with loved ones and a light, refreshing beverage and a scrumptious dessert together! Outdoor dining and spending time on the patio is what we look forward to in the Summer!
Some great ones to try are:
- Peach-Berry Smoothies
- Watermelon Cooler
- Creamy Mango Smoothies
- Key Lime Yogurt Pie
- Chocolate Mousse Macadamia Tart
I've found these and countless other recipes on lifemadedelicious.ca. They've quickly become family favourites.
Check out the lifemadedelicious.ca website and let me know which recipes you'll be serving up this Summer!
Disclosure: I am part of the Life Made Delicious. Blogger program and I receive special perks as part of my affiliation with this group. The opinions on this blog are my own.
Friday, June 21, 2013
Key Lime Parfaits ~ Refreshing Summer Treat
I have two really good girlfriends that I wish I had more time with. We all live on the Island, except on opposite ends. Getting together takes planning in advance. I miss these lovely ladies and really do wish we could see each other more often. Crazy how we all live on the Island, yet due to life, kids, work, and the every day things that keep us busy, we only see each other a few times a year.
This is why we came up with our Key Lime Pie dates. We love our key lime get-togethers! It's a great chance for us to catch up, chat, enjoy each other's company, and enjoy a great lunch. We always end our visit with a slice of key lime pie.
I made something a little bit different for our lunch date today.


This is why we came up with our Key Lime Pie dates. We love our key lime get-togethers! It's a great chance for us to catch up, chat, enjoy each other's company, and enjoy a great lunch. We always end our visit with a slice of key lime pie.
I made something a little bit different for our lunch date today.

Key Lime Parfaits
Ingredients:
Zest of 1 key lime, grated (2 tbsp)
Juice of 1 key lime (or regular lime if you don't have access)
OR 2 tbsp limeade concentrate
1 can sweetened condensed milk (14 oz can)
2 cups homemade whipped cream (I use Martha Stewart's whipped cream recipe)
1 c Graham Cracker Crumbs
3 tbps granulated sugar
3 tbsp butter, room temperature
Instructions:
- In a bowl, mix together condensed milk, lime juice OR limeade (I use the limeade because I like the extra bit of punch), and grated lime zest.
- In a separate bowl, mix Graham Cracker Crumbs, sugar and butter. I use room temperature butter. No need to melt the butter. It mixes nicely at room temp.
- Scoop 2 tbps of crumb mixture into parfait cups and press firmly to form the base/crust.
- Add 2 tbsp of key lime mixture.
- Add a layer of whipped cream.
- If you wish, you can add another layer of crumbs, key lime mixture, whipped cream, or keep it sweet and simple.
- To garnish, I just added a sprinkle of Graham Cracker crumbs and a slice of lime.
- Chill for 2 hrs+. I chill mine in the refrigerator overnight to make sure everything is solidified. The first time I made this, I was so impatient and we wanted to dig in. The result was more like a key lime soup! Note to self: Make sure you chill the key lime dessert long enough!
Et, voila! Makes for a quick, easy, refreshing treat to enjoy with your favourite gal pals.

Wednesday, June 19, 2013
Turón Bites ~ A Spin on a Filipino Street Food Fave

As a little girl, I remember my Mom, grandmother, and aunts sitting around the kitchen table, telling stories, laughing and wrapping Turón. The ladies would expertly wrap sliced up plantain, jack fruit and sugar in spring roll wrapper, and fry them.
It was always a special treat and a family favourite.
Whenever I have this Filipino treat, I think of my family and my childhood.
I was so shocked to see the local Foodland had plantain! I promised myself I'd only cook with local produce in my attempt to tread lighter on the earth, and also help support local farmers. I couldn't resist though. I had picked up a few cans of jack fruit when I was in Ottawa recently and had Turon on the brain.
My aunt's original recipe calls for large spring roll wrappers. Our local grocery store only carries the small wonton and egg roll wrappers. From experience, I know that the egg roll wrappers get bubbly when fried. That would be a definite no-no. I settled on the wonton wrappers. After all, we use what we have or have access to, right?
Ingredients:
1 large plantain, sliced
1 can jack fruit (slice the jack fruit into strips)
sugar to dust (white or brown sugar)
1 pkg spring roll wrappers (in this case, 2 pkgs wonton wrappers)
oil for frying

Instructions:
1. Slice plantain into small, thin slices. I did them about 3 inches long and 1/2 inch thick.
2. Drain jack fruit and slice 3/4 cm in thickness.
3. Take one won ton or spring roll wrapper and place 1 slice of plantain and 1 slice of jack fruit in centre. Dust with sugar. Brown sugar works best for this treat. The caramelized brown sugar is lovely with the banana.
4. Wrap and form a "roll" by folding ends over the banana and jack fruit, using water to seal.
5. Repeat process until you have used up all the spring roll wrappers.
6. Heat a skillet or pan and add cooking oil. Add a few rolls, but be careful not to overcrowd pan. Cook until golden on med heat, then turn over. Keep cooking until other side is golden. It doesn't take too long to cook.
7. Remove from pan and either place on plate with paper towel. Sprinkle sugar over top while still hot.
These are smaller than the original Turon. Perfect bite-sized treats for entertaining and also perfect for little ones, as I've noticed that the original size Turon can be a bit too much for little kids to eat. Hubby, on the other hand, can eat his fair share of the original-sized Turon!

Enjoy! This is best when eaten hot!
Saturday, June 08, 2013
Roasted Miso Honey Glazed Carrots: A Request By My 4 Year Old
I admit it. I'm a cooking show fanatic. It started when I was very young. My maternal grandparents (may they both rest in peace) used to watch cooking shows and soap operas all the time and the cooking show love was passed down to their grandchildren.


Food Network or cooking shows on CBC -- It doesn't matter. I'm hooked.
It's no surprise that my four year old is also a huge fan of food TV. When she was two years old, if there was a cooking segment on Steven and Chris, she would stop whatever she was doing and become fixated. When I was food blogging for season one of Recipe to Riches, Little One was totally involved in the experience too. She never missed an episode!
Today, she turned on the TV while I was cleaning the house and was watching In the Kitchen with Stefano Faita!
I wasn't paying too much attention, but could hear the show in the background. I did end up catching the end of the show, so when Little One said she wanted Stefano's roasted miso honey glazed carrots, I figured I could recreate the dish with what info I did hear.

What my four year old neglected to tell me was that it wasn't just roasted carrots. It was really Roasted Carrots & Brussels Sprouts in Miso Honey!
Here's Stefano's amazing Roasted Carrots & Brussels Sprouts in Miso Honey recipe, and here's what I ended up making...
Roasted Miso Honey Glazed Carrots
Ingredients:
4 large carrots, peeled and cut lengthwise down the middle (Stefano just cut his carrots in half and it made for stunning presentation)
2-3 cloves garlic, minced
2-3 cloves garlic, minced
1 Tbsp white miso paste
2 Tbsp olive oil
2 Tbsp local Manitoulin honey
a bit of water
Salt and pepper
garnish
Sesame seeds
Parsley, choppped
Instructions:
Preheat oven to 425 F
In a bowl mix together the miso paste, honey, olive oil, garlic, water (and salt and pepper to taste).
Arrange carrots on baking sheet and pour mixture over carrots. Mix, making sure carrots are coated evenly.
Roast in oven for 20 min.
Once cooked, arrange in serving dish and garnish with parsley and sesame seeds.
Though my four year old INHALED the roasted carrots and deemed them to be her new favourite dish, next time I am going to try Stefano's original recipe! I LOVE Brussels Sprouts, and am always looking for new ways to cook them. This will be delicious, I'm sure!
Totally missed the part of the segment where Stefano was cooking this dish and therefore missed the part about the ginger, Brussels Sprouts, and cilantro instead of parsley! It was still delish! My four year old has given her two thumbs up.She was the one who added the garnish and was very pleased with herself.
Watch Stefano's videos online here.

What's your child's favourite dish? Do your kids enjoy cooking shows?
Friday, June 07, 2013
Filipino Bistek (Beef Steak) @CanadianBeef #LoveCDNBeef
With May being the month my Lola (grandmother) passed away last year, I've found myself making a lot of Filipino dishes. We're now into the beginning of June and I find I'm still cooking a lot of Filipino food. This has totally been done unintentionally. I think it's perhaps because I really, really miss my grandmother right now. I've also been missing her cooking and by me cooking up some of the food that remind me of her, it also brings me back to my roots.
My husband and four year old daughter certainly don't mind. We had Filipino Bistek for supper tonight and it was a hit.
This is a family recipe that has been tweaked. I didn't have *calamansi (citrus fruit native to the Philippines - looks like a little lime/lemon). Since I can't get calamansi where I live, I use regular lemons. It doesn't taste quite the same as the Bistek in the Philippines, but it does the trick!

My husband and four year old daughter certainly don't mind. We had Filipino Bistek for supper tonight and it was a hit.
This is a family recipe that has been tweaked. I didn't have *calamansi (citrus fruit native to the Philippines - looks like a little lime/lemon). Since I can't get calamansi where I live, I use regular lemons. It doesn't taste quite the same as the Bistek in the Philippines, but it does the trick!

Filipino Bistek
Ingredients:
1 lb of beef sirloin, sliced thinly (about a quarter inch in thickness)
*the juice of 1 lemon, freshly squeezed
2 tbsp minced garlic (I like a lot of garlic, so I actually put in 4-5 cloves, minced)
2 large onions, cut into rings
1/2 c soy sauce
black pepper, freshly ground
cooking oil
Instructions:
- Slice beef into thin strips. Season beef with freshly ground black pepper.
- In a large bowl, mix together the garlic, soy sauce, and lemon juice.
- Marinate meat in soy/garlic/lemon juice mixture. Overnight is best, but if you're short on time, at least 30 minutes.
- In a skillet, heat cooking oil (enough to cover the bottom of the skillet) and stir fry the onion 'rings' until slightly soft and slightly golden. Make sure not to overcook them. Remove from skillet and set aside.
- Using the same skillet you cooked the onions in, pan fry the strips of beef. It's best to cook in small batches.
- Once all the meat has been cooked, return to skillet. Let cook for a few minutes in the sauce. If you need to add more soy or lemon juice, add according to your taste. I don't like my Bistek too salty and prefer it on the sour/lemony side.
- Place beef slices on a serving plate with onion rings arranged on top of meat.
- Pour remaining sauce over Bistek and serve with rice (and whatever vegetables you'd like on the side). In true Filipino style, spoon sauce over rice and eat!
Thursday, June 06, 2013
I missed Dine & Dish with Dawn. but have a Bacon Seafood Chowder Poutine #Recipe for you! #PGMom
My husband likes to joke that I'm a veritable snob when it comes to food. Why? Well, he thinks it's funny that I like my food authentic and the way it was meant to be enjoyed. Case in point: I went to Singapore for a real Singapore Sling and some Singapore Noodles, Philadelphia for a real Philly Cheese Steak, Bali for some authentic Nasi Goreng, Japan for real sushi...You get the point.
Having grown up in Montreal, I simply cannot eat certain Quebecois foods that are made in places other than Quebec. It's just not the same. Though I have been living in Ontario for a while now, I still cannot eat poutine, bagels or smoked meat if they're not Montreal style. I know, I know. Awful! I just can't!
I know it's just poutine! I realize it seems silly to be so fussy about the way it is prepared, but I was horrified when I saw places serving grated cheddar or Mozzarella cheese instead of the squeaky cheese curds (also known as "poutine cheese"). If it doesn't squeak, it's not the right cheese!
In the past few years, I've seen variations of poutine recipes. Gourmet poutine like poutine avec foie gras or poutine with Montreal smoked meat are common now. I've had poutine with spicy chili and pulled pork. I have no objections when it comes to being adventurous with poutine recipes. Just please don't put grated cheese and overly salty, lumpy gravy from a packet on some fries and call it poutine.
On Wednesday, June 5th, Food Network’s John Catucci hosted Dine & Dish with Dawn - a pop-up poutinerie at Yonge-Dundas Square in Toronto, where the poutine was free if you cleaned your own dish with Dawn Ultra. That’s right; if you eat it – you clean it! P&GMom bloggers were invited to join the grease-cutting, poutine party.

Friends and family know that I'm addicted to Food Network and absolutely love John Catucci! I wish I had been able to attend the event. Living six hours north of Toronto makes it a challenge to attend all the events I would love to be at.
Instead, I made a Bacon Seafood Chowder Poutine (because I'm wacky like that). This is something I just came up with because A) I was craving chowder and B) I was craving carbs. Because I cannot eat poutine in Ontario, I just don't eat it. This time, however, I had a hankering for some! We normally do not eat food so rich and full of...potato!

Please excuse the poor quality photo taken with my 4 year old's iPod. I couldn't find my camera!
Bacon Seafood Chowder Poutine
Ingredients:
Seafood chowder
2 tbsp butter
Instead of butter, I used 4 strips of bacon, chopped
1 stalk celery, chopped
1 onion, chopped
1 tsp thyme
salt and pepper
2 large potatoes, washed, peeled, and diced
2 c water (or fish stock or vegetable stock--whichever you prefer)
2 c milk
1/3 c flour
1 c fresh fish, chopped and with skin removed (I use whatever fish my Dad has caught for us fresh from the lake)
2 c cooked seafood combination
-lobster
-scallop {seafood in bite sized pieces, amount depends on your taste/preference}
-shrimp
-crab
-oyster
Cheese curds for poutine. I had a package from my friend brought me back from Quebec. It's not real poutine cheese if it doesn't squeak!
Fries for poutine
potatoes, washed, peeled and cut into fries. In our house we generally cook "1 potato per person and 1 for the pot". If you don't want to make your own fries, just use frozen french fries and follow cooking instructions on the package.
Instructions for chowder:
In large stock pot, saute with butter (or in this recipe, chopped bacon) the celery, onion, thyme, salt and pepper. When onion starts to turn golden, add potatoes and saute them for a few minutes.
Stir in water and increase heat to boil. Cover pot and reduce heat. Let potatoes cook until slightly tender.
In a measuring cup or bowl, whisk flour into milk to act as thickener for your chowder. Add to pot and simmer, making sure to stir and not scald.
Add fish and seafood and stir often. Cook until fish is no longer translucent or until it becomes flaky.
Arrange fries in a bowl or dish and generously ladle seafood chowder and add cheese curds onto fries.
Enjoy!
Since I wasn't able to be at the Dine & Dish event, I dined and dished at home with Dawn by taking the Dawn Ultra grease-fighting challenge. Let me tell you that Dawn really cut the grease and cleaned those dishes pretty much effortlessly!

Disclaimer: I am a P&G Mom. As part of my affiliation with this group, I receive products and special access to P&G events and opportunities. The opinions on this blog are always my own, are never influenced by brand relationships, and are not paid unless otherwise stated (“sponsored post”).
Wednesday, June 05, 2013
I'm Featured in @EatInEatOutMag!
So excited to announce that I've been featured in www.eatineatout.ca! My Filipino BBQ recipe can be found here!

This is the dish that is a must serve at all our BBQ parties:

Want the recipe? Check out Eat In Eat Out Magazine's Summer Grilling Issue!
Friday, May 17, 2013
May 2-4 is the Unofficial Start of Summer! Target Canada Makes Summer Living Easy! @target_ca {GIVEAWAY}

May 2-4 is the Unofficial Start of Summer and Target Canada Makes Summer Living Easy.
For many of us in Canada, Victoria Day long weekend is the unofficial start of Summer! You know it's true. We get really excited with the milder weather. To us, May 2-4 weekend is shorts and flip flops time! It's when we open up our cottages, head to the lake, do some serious outdoor entertaining and rev up the 'ol BBQ!
Target Canada has prepared a check-list of all the essentials families will need to kick off the season. They've thought of everything from Road Trip Essentials to Cottage Weekend and Summer Entertaining!
ROAD TRIP ESSENTIALS
The family road trip can be tough – often inching along as everyone hits the highway for the inaugural cottage visit or weekend away. To keep kids occupied (and drivers sane), be sure to pack the following:
COTTAGE WEEKEND
May 2-4 often marks the opening of family cottages across the country. Load the family van with these essentials to ensure everyone has a great weekend together and is ready for the summer:
SUMMER ENTERTAINING
Canadians love to entertain outdoors and take advantage of beautiful summer-like weather. Target has everything from Bublé to bistro sets to make entertaining a breeze this season:
The family road trip can be tough – often inching along as everyone hits the highway for the inaugural cottage visit or weekend away. To keep kids occupied (and drivers sane), be sure to pack the following:
- Snacks – keep a secret stash of goodies to make a long trip a bit more bearable (and fast food pit stops to a minimum). Target’s owned brands Market Pantry and Archer Farms have a variety of snack items including fruit strips, granola, chips and popcorn to snack on along the way
- Car friendly games – for long drives, best to pack some car friendly games and books to keep little ones occupied and entertained.
- iPad – make sure the family iPad is fully charged for tech savvy kids to quietly play their favourite games in the back.
- DVD – great for a rainy day or dull drive, pack favourite movies for the DVD player, such as The Rise of the Guardians, Mulan or The Lorax.
- Safety First – with so many cars on the highway, make sure to have a fully stocked first aid kit in the trunk.
COTTAGE WEEKEND
May 2-4 often marks the opening of family cottages across the country. Load the family van with these essentials to ensure everyone has a great weekend together and is ready for the summer:
- Cottage comfies - Mother Nature doesn’t always cooperate for the long weekend. Be sure to pack warm clothes and blankets if temperatures drop at night. The Roots Outfitters for Target collection has hoodies and jogging pants for the whole family to keep warm round the campfire.
- Sun/Skincare – be sure to hit the pharmacy aisle to be prepped for the elements. Don’t forget sunscreen, bug spray and a first aid kit for the cottage and boat. Target’s Up and Up line has everything to stock the medicine cabinet with all essentials for the summer.
- Meals – bring foods that are easy to cook so you can spend more time outside having fun with family and friends. Frozen pizzas and chips and dips are easy items to have on hand for quick bites and easy but delicious appetizers for guests.
SUMMER ENTERTAINING
Canadians love to entertain outdoors and take advantage of beautiful summer-like weather. Target has everything from Bublé to bistro sets to make entertaining a breeze this season:
- Plastic makes perfect – with kids running around in bare feet, plastic dishes and stemware make entertaining outside stress free. Target’s Threshold collection carries colourful dishes and serving trays to create a beautiful outdoor tabletop.
- Accessorize – gardens and greenery provide a beautiful backdrop for any occasion. Add to the outdoors with seasonal accessories including bright patio rugs, umbrellas and pillows.
- Ambiance – set the mood with outdoor lanterns and low background music (but remember, sound travels!)
- Food - check the grocery aisle for quick and easy appetizers to pop in the oven as guests arrive. Archer Farms’ Spanakopita and Lobster and Cheese bites are crowd pleasers – just make sure you have enough on hand for seconds!
Now, if you know me in real life or if you've been reading this blog for a while, you'll know that I am all about entertaining. I love hosting dinner parties and I love cooking for lots of people!
Target Canada has some fabulous ideas for your Summer entertaining! The ingredients for these next dishes are available at Target, including all the Market Place products (chickpeas and extra virgin olive oil for the dip and marshmallows for the S'mores bars). The Ghiradelli chocolate chips and Golden Grahams Crunch cereal are also available at Target.
The following recipes are courtesy of Target Canada:
The following recipes are courtesy of Target Canada:

{ CHICKPEA & FETA DIP }
What you need:
Here’s how:
1. Process chickpeas, 1/2 cup cheese, 1/4 cup peppers and next 4 ingredients in food processor until smooth.
2. Spoon into serving bowl; top with remaining cheese and peppers.
3. Serve with crackers.
- Serve with TRISCUIT Thin Crisps or Archer Farms Tortilla Chips
- Two kinds of crunch: serve dip with cut-up fresh vegetable dippers in addition to crackers
What you need:
- 2 cans (15 ounces each) chickpeas (garbanzo beans), rinsed
- 2/3 cup crumbled feta cheese, divided
- 1/3 cup roasted red pepper strips, divided
- 1 clove garlic
- 3 tablespoons extra-virgin olive oil
- 1 teaspoon toasted sesame oil
- Juice of 1/2 lemon
- TRISCUIT Crackers
Here’s how:
1. Process chickpeas, 1/2 cup cheese, 1/4 cup peppers and next 4 ingredients in food processor until smooth.
2. Spoon into serving bowl; top with remaining cheese and peppers.
3. Serve with crackers.
- Serve with TRISCUIT Thin Crisps or Archer Farms Tortilla Chips
- Two kinds of crunch: serve dip with cut-up fresh vegetable dippers in addition to crackers
and

{ HONEY GRAHAM CRUNCH S'MORES BARS }
What you need:
Here’s how:
1. Spray 8 or 9-inch square pan with cooking spray.
2. Melt butter in large saucepan over LOW heat; add 3 cups miniature marshmallows. Cook and stir until melted and smooth; remove from heat. Add cereal; mix until well coated.
3. Press firmly into prepared pan with the back of a buttered spoon or waxed paper. Sprinkle 1
1/2 cups miniature marshmallows in single layer over top.*
4. Heat chocolate chips in medium microwave-safe bowl on HIGH 1 minute; stir. Heat in additional 10 second increments until completely melted. Spread evenly over top of marshmallows. Let stand until chocolate is set. - Makes 16 bars
- If desired, toast marshmallows by heating under broiler a few minutes until lightly browned. Then drizzle with chocolate.
- This recipe can easily be doubled and made in a 13x9-inch pan. (You will need to purchase 2 bags of miniature marshmallows.) - Sprinkle over hot cereal.
- These make a great snack just served plain or mixed with dried fruit.
- Stir slightly crushed cereal into ice cream or frozen yogurt for a crunchy treat.

What you need:
- 3 Tbsp. butter
- 3 cups miniature marshmallows
- 4 cups Honey Graham Crunch cereal
- 1 1/2 cups Market Pantry miniature marshmallows
- 1 (11.5 oz.) bag milk chocolate chips
Here’s how:
1. Spray 8 or 9-inch square pan with cooking spray.
2. Melt butter in large saucepan over LOW heat; add 3 cups miniature marshmallows. Cook and stir until melted and smooth; remove from heat. Add cereal; mix until well coated.
3. Press firmly into prepared pan with the back of a buttered spoon or waxed paper. Sprinkle 1
1/2 cups miniature marshmallows in single layer over top.*
4. Heat chocolate chips in medium microwave-safe bowl on HIGH 1 minute; stir. Heat in additional 10 second increments until completely melted. Spread evenly over top of marshmallows. Let stand until chocolate is set. - Makes 16 bars
- If desired, toast marshmallows by heating under broiler a few minutes until lightly browned. Then drizzle with chocolate.
- This recipe can easily be doubled and made in a 13x9-inch pan. (You will need to purchase 2 bags of miniature marshmallows.) - Sprinkle over hot cereal.
- These make a great snack just served plain or mixed with dried fruit.
- Stir slightly crushed cereal into ice cream or frozen yogurt for a crunchy treat.

{ WIN IT }
Who's ready for Summer? Are you excited for May 2-4 Weekend? Leave a comment telling me how you'll be spending your Victoria Day weekend and you can win a $50 Target Gift Card with which you can buy your Summer entertaining essentials (or buy something nice for yourself)!
Open to residents of Canada. Ends June 3, 2013.
Open to residents of Canada. Ends June 3, 2013.
Disclosure - I was compensated for this post, however all the thoughts and opinions expressed on this blog are honest and my own.
Monday, May 13, 2013
Mother's Day Brunch Made By Hubby w/ @MLFConnects #Bacon Portions {Giveaway}
My husband loves his bacon. When he discovered Maple Leaf Bacon Portions at the local grocery store, he thought it was the best thing ever. Seriously, I've never seen a man more excited about a grocery purchase ever.
Maple Leaf Bacon Portions are a great idea - so you never waste bacon again. You can keep your bacon fresh for any time you need it. No more need for scissors or the knife to open the packaging, because it comes with easy-to-peel packaging!
When my husband told me about this amazing "easy-to-peel package" and "never waste bacon" concept, I laughed because...We NEVER waste bacon in this house! Bacon doesn't last long enough here with a husband and Little One who love their bacon! This said, I do think it's an ingenious invention because there are days when you don't need an entire HUGE package of bacon. The "portions" do come in handy!
Check out what my husband and Little One made me for Mother's Day Brunch!

I have never seen a frittata this fluffy! It was delicious! I wanted to share the recipe with you, but it's my husband's secret recipe and he won't even share it with me! He did say that one of the most important ingredients is the Maple Leaf Portions! I think he cooked up the bacon in the cast iron skillet and then used the bacon grease to cook the frittata.

Isn't that gorgeous?
Here's a little video of my two loves. They're so cute! Shameless plug coming up...I made this video with my BlackBerry Z10's STORYMAKER! I love that feature!
Humour me for a second while I tell you a super cute story.
Listening to Hubby & Little One making lunch for "the moms" & fam. I was laughing so much, I was crying.
HUBBY: This is how we make a Frittata for Mother's Day.
LO: I know what a Frittata is! Hakuna Frittata! It's a wonderful thing. It means no worries for the rest of your life...
Isn't that hilarious?! My 4 year old cracks me up! I think we should hence forth call that frittata the Hakuna Frittata! Any Lion King fans out there? *sigh* You know you're a parent when...
If you check out the Maple Leaf Foods website, you can find lots of great recipes to make with bacon! Check out these Maple Bacon Waffles I made! I used maple syrup from our farm!

They were delicious! A definite keeper! I'll be making these again (and again). The recipe is on the Maple Leaf website here.

To enter: Simply fill out the Rafflecopter form below. Open to residents of Canada. Ends 5/29.
a Rafflecopter giveaway
Maple Leaf Bacon Portions are a great idea - so you never waste bacon again. You can keep your bacon fresh for any time you need it. No more need for scissors or the knife to open the packaging, because it comes with easy-to-peel packaging!
When my husband told me about this amazing "easy-to-peel package" and "never waste bacon" concept, I laughed because...We NEVER waste bacon in this house! Bacon doesn't last long enough here with a husband and Little One who love their bacon! This said, I do think it's an ingenious invention because there are days when you don't need an entire HUGE package of bacon. The "portions" do come in handy!
Check out what my husband and Little One made me for Mother's Day Brunch!

I have never seen a frittata this fluffy! It was delicious! I wanted to share the recipe with you, but it's my husband's secret recipe and he won't even share it with me! He did say that one of the most important ingredients is the Maple Leaf Portions! I think he cooked up the bacon in the cast iron skillet and then used the bacon grease to cook the frittata.

Isn't that gorgeous?
Here's a little video of my two loves. They're so cute! Shameless plug coming up...I made this video with my BlackBerry Z10's STORYMAKER! I love that feature!
Humour me for a second while I tell you a super cute story.
Listening to Hubby & Little One making lunch for "the moms" & fam. I was laughing so much, I was crying.
HUBBY: This is how we make a Frittata for Mother's Day.
LO: I know what a Frittata is! Hakuna Frittata! It's a wonderful thing. It means no worries for the rest of your life...
Isn't that hilarious?! My 4 year old cracks me up! I think we should hence forth call that frittata the Hakuna Frittata! Any Lion King fans out there? *sigh* You know you're a parent when...
If you check out the Maple Leaf Foods website, you can find lots of great recipes to make with bacon! Check out these Maple Bacon Waffles I made! I used maple syrup from our farm!

They were delicious! A definite keeper! I'll be making these again (and again). The recipe is on the Maple Leaf website here.
{WIN IT}
Now that I've probably got you thinking BACON, would you like to win some? TWO lucky Life on Manitoulin readers will win $20 in FPC (free product coupons) EACH. That's $40 of product in total we're giving away.
To enter: Simply fill out the Rafflecopter form below. Open to residents of Canada. Ends 5/29.
a Rafflecopter giveaway
Friday, May 10, 2013
May is Love Your Lentils Month! PLUS a Twitter Party & Contest #LoveLentils
Have you heard about the Love Your Lentils Recipe Contest?

When I was at the Food Bloggers of Canada Conference last month, I had the chance to chat with the wonderful folks from @CdnLentils. I couldn't resist the heart shaped postcard that boasted the face of none other than one of my absolute favourite chefs! CHEF MICHAEL SMITH!!!
I am absolutely ga-ga over Chef Michael Smith! Even my 4 year old daughter knows who he is! She's been watching Chef at Home with me ever since she was a teeny tiny tot!

Lentils just so happen to be one of my family's favourite things to eat! I use lentils in soup, curries, stews, salads, pureed into a hummus-like dip, and in my baking. It's so versatile and so good for you!
Did you know that May us Love Your Lentils Month?
I took the plunge and submitted my Trinidadian Oxtail Lentil Stew recipe in hopes that I get selected to spend a day with Chef Michael Smith! If you've entered the contest, I'd love to see your amazing lentil recipes! Please share! Plus, I get to see what I'm up against! Just kidding!


Love Your Lentils Recipe Contest
Open to Canadians
PRIZES
Contest Entrants may have a chance winning one prize per entry, of which the prizes may include:
Grand Prize
There are three (3) grand prizes available. One (1) in the category of Bloggers, one (1) in the category of Home Cooks, and one (1) for the Voter. Any successful Voter will have to answer a skill testing question to win the grand prize.
Each Grand Prize Includes:
On Sunday, June 23, 2013, grand prize recipients and one guest will join Chef Michael Smith for a culinary adventure in Saskatoon, Saskatchewan where he will guide them through a Saskatchewan’s culinary adventure!
What’s Included:
- Flight/transportation for two (2) to Saskatoon for June 23, 2013
- 3 nights accommodation (June 21/22/23) at the luxurious Delta Bessborough
- $500 spending money for the trip
Second Prize
There are two (2) second place prizes available – one (1) in the category of Bloggers and one (1) in the category of Home Cooks.
Each Second Prize Includes: $500 giftcard to Amazon.ca
Third Prize
There are two (2) third place prizes available – one (1) in the category of Bloggers and one (1) in the category of Home Cooks.
Each Second Prize Includes: $200 giftcard to Amazon.ca
Winners will be notified via Email.
All prizes will be awarded by June 13, 2013. Prizes must be claimed by June 17, 2013 – no extensions will be permitted. Prizes must be accepted as awarded and cannot be exchanged, transferred or converted for cash. Prize does not include any fees, charges, taxes, gratuities, insurances, or personal expenses other than those costs/value or benefits described above.

Even more fun! To kick off the recipe contest, there will be a Love Your Lentils Twitter Party May 14th at 8:00 PM with Chef Michael Smith! I know, right?!
Check out the party and learn all about Lentils! Discover some delicious new recipes while you're at it. There will be some great prizes to win as well. Prizes include, cookbooks, cookware and starter kits.
Monday, May 06, 2013
Avocado Recipes! Say Hello to @MissAvaCado #LuvMexAvocado
Creamy, buttery, smooth, tasty, delicious, and nutritious. I'm all about the avocado and I'm always looking for new and exciting avocado recipes.
Being married to a farmer, of course we grow a lot of our produce and I support buying local food. What we can grow on our own, we do and what we can buy locally, we do. This said, I absolutely love my guac and will eat it too.
Guacamole was one of Little One's favourite foods as a baby. Before she could really talk, she would say, "GA-KA-MO-YEE!!!" to which we knew was her way of asking, "May I please have some guacamole, Mom?"
Not only is the avocado delicious, but it's one of the best first foods for babies, a great brain booster, and fun finger food!



Want to know more about Avocados from Mexico? Check out their website here! Chat with them on Facebook and on Twitter too!
Disclosure - Though I have been compensated for this post, all the thoughts and opinions expressed on this blog are honest and my own.
Being married to a farmer, of course we grow a lot of our produce and I support buying local food. What we can grow on our own, we do and what we can buy locally, we do. This said, I absolutely love my guac and will eat it too.
Guacamole was one of Little One's favourite foods as a baby. Before she could really talk, she would say, "GA-KA-MO-YEE!!!" to which we knew was her way of asking, "May I please have some guacamole, Mom?"
Not only is the avocado delicious, but it's one of the best first foods for babies, a great brain booster, and fun finger food!
Avocado Recipes Your Family Will Love
I'm not the only one who loves avocado! My husband and daughter cannot resist a burger dressed up with avocado slices or a bowl of sweet coconut-avocado ice cream!

I was in need of a quick lunch, so I threw together a light meal with some ingredients we had from the night before. I diced up some cherry tomatoes, onion, yellow pepper, and the star ingredient - avocado, and added some lemon juice, cilantro, a few cracks of the pepper mill. I also tossed in some crab meat from our sushi night the night before. I never made anything with crab and avocado before, but all of the flavours married together so well. It made for a lovely, refreshing lunch. Above photo: Avocado Crab Salad on Ryvita Crackers.

I make a really delicious Coconut Avocado Smoothie, but saw this recipe on the Avocados from Mexico website. It's a Walnut Key Lime Pie Smoothie! Instead of 3/4 cup of cold water, I used 3/4 cup milk just because my 4 year old likes creamy, thick smoothies. The photo above is of mine and the one below is of Little One's. She says, "I don't like the texture or taste of walnuts."
Little does she know, I ground the 1/3 cup of walnut halves into the smoothie mixture!

I was also curious about the Chocolate-Avocado Cupcakes on the Avocados from Mexico website! I usually make a Chocolate-Zucchini Cake or Chocolate-Zucchini Brownies, but never Chocolate-Avocado anything!
The result? Moist, delicious cupcakes.

Avocado Recipes for everyone
What I love about avocados (apart from the flavour and nutritional value) is how versatile they are. I never used avocados in desserts (with the exception of my avocado ice cream and smoothies). It certainly never occurred to me to add avocados to my baking!
In our home, I use avocados in sandwiches (I love a good chicken, bacon, tomato, avocado, alfalfa sprout sandwich), in sushi (to be correct, it would be maki since sushi is made with raw seafood), in salads, and of course, guacamole!
Avocados would definitely be in my Top 5 favourite things to eat.
Disclosure - Though I have been compensated for this post, all the thoughts and opinions expressed on this blog are honest and my own.
Monday, April 22, 2013
Rainbow Pinwheel Cookies
If there's one thing you may or may not know about me, it's that I'm addicted to Pinterest. Addicted. I can't stop "pinning" all my favourite recipes, items for the house, etc. I can't help it. I love surrounding myself with beautiful things and I love creating (or attempting to recreate) beautiful things.
My brother's girlfriend recently showed me these really pretty Rainbow Pinwheel Cookies on Pinterest. I thought they were so pretty, and just had to try making them!

If you've been reading my blog for a while, you'll know that A) My family and I eat very healthy, I grow a lot of our food, we don't give our daughter too much sugar, B) My four year old daughter actually doesn't like overly sweet things, and C) Though I feed my family healthy, every now and then I give us a little treat. A package of Twistos, the occasional frozen pizza, or some homemade baked goods are treats for our family.
Despite knowing that my daughter doesn't like cookies, I still wanted to bake the really cool looking Rainbow Pinwheel cookies!
The sugar cookie recipe I use is this one, but I substitute natural cane sugar for the white sugar.

 Once you've mixed your sugar cookie ingredients, separate dough into five equal portions and put them in separate bowls. Here's where the fun begins! Add food colouring to each bowl. This is a great opportunity to teach kids about colours. Little One was excited to see that red and blue make her favourite colour: purple!


The verdict? My 4 year old daughter looked at them and said, "That's nice, Mom. Can I have an orange?"
Little One loves baking in the kitchen with Mom and she loves the idea of cookies. She just doesn't like eating cookies or sweets. I guess I can't complain! So happy she loves fruit more than cookies!
I ended up having to give all the cookies to friends and family since we baked 4 dozen cookies! Little One and I don't really like sweets and Hubby doesn't need them! It was a fun activity to do with my daughter though!
My brother's girlfriend recently showed me these really pretty Rainbow Pinwheel Cookies on Pinterest. I thought they were so pretty, and just had to try making them!

If you've been reading my blog for a while, you'll know that A) My family and I eat very healthy, I grow a lot of our food, we don't give our daughter too much sugar, B) My four year old daughter actually doesn't like overly sweet things, and C) Though I feed my family healthy, every now and then I give us a little treat. A package of Twistos, the occasional frozen pizza, or some homemade baked goods are treats for our family.
Despite knowing that my daughter doesn't like cookies, I still wanted to bake the really cool looking Rainbow Pinwheel cookies!
Rainbow Pinwheel Cookies
The recipe itself is basically your standard sugar cookie recipe. I'm sure you have a family favourite, but in case you don't already have a sugar cookie recipe you use all the time, here's one from Canadian Living.The sugar cookie recipe I use is this one, but I substitute natural cane sugar for the white sugar.


I chilled the dough and then Little One and I made grape-sized balls with each colour dough.

Take one small ball of dough of each colour...

Make one ball using each colour

Roll out dough or just shape with hands to create what Little One calls a "doughy worm"

Shape into what 4 year old calls a "Snail Shell"

Bake in preheated oven at 375 degrees for 8 to 10 minutes.


The result: Really pretty Rainbow Pinwheel Cookies.
The verdict? My 4 year old daughter looked at them and said, "That's nice, Mom. Can I have an orange?"
Little One loves baking in the kitchen with Mom and she loves the idea of cookies. She just doesn't like eating cookies or sweets. I guess I can't complain! So happy she loves fruit more than cookies!
I ended up having to give all the cookies to friends and family since we baked 4 dozen cookies! Little One and I don't really like sweets and Hubby doesn't need them! It was a fun activity to do with my daughter though!
Subscribe to:
Posts (Atom)
From Our Farm to Your Table

Farmers Feed Cities

You Can Find Me Here!


Affiliates
|
|
|
|
|
|
|
|
 |
 |
 |

Brand Ambassador for








For Fellow Bloggers

|

|
 |
 |

Proud Recipient

About the Blog Author

City girl moves to the country, falls in love, and marries a farmer. She tries to incorporate her city ways with her new country lifestyle and blogs to keep in touch with friends, family & students who live far, far away :) Can this city girl go country? Watch as she learns all sorts of exciting things about life on the farm and in a small rural community. *UPDATE* We are now parents! Our baby girl was born on Nov. 11, 2008 (at 28 weeks gestation- 12 weeks premature, but she's quite the trooper)!!!

Les Boutons!


Let's Connect



Subscribe To


 Posts
All Comments
Posts
All Comments

Support